Text Editor
On opening the template or document, you'll see the Text Editor, which consists of main sections: Tool Bar, Page, Editor View, Abstract Reference Settings, Reivision Setting, Reference Trace View and Abstract Reference Setting.
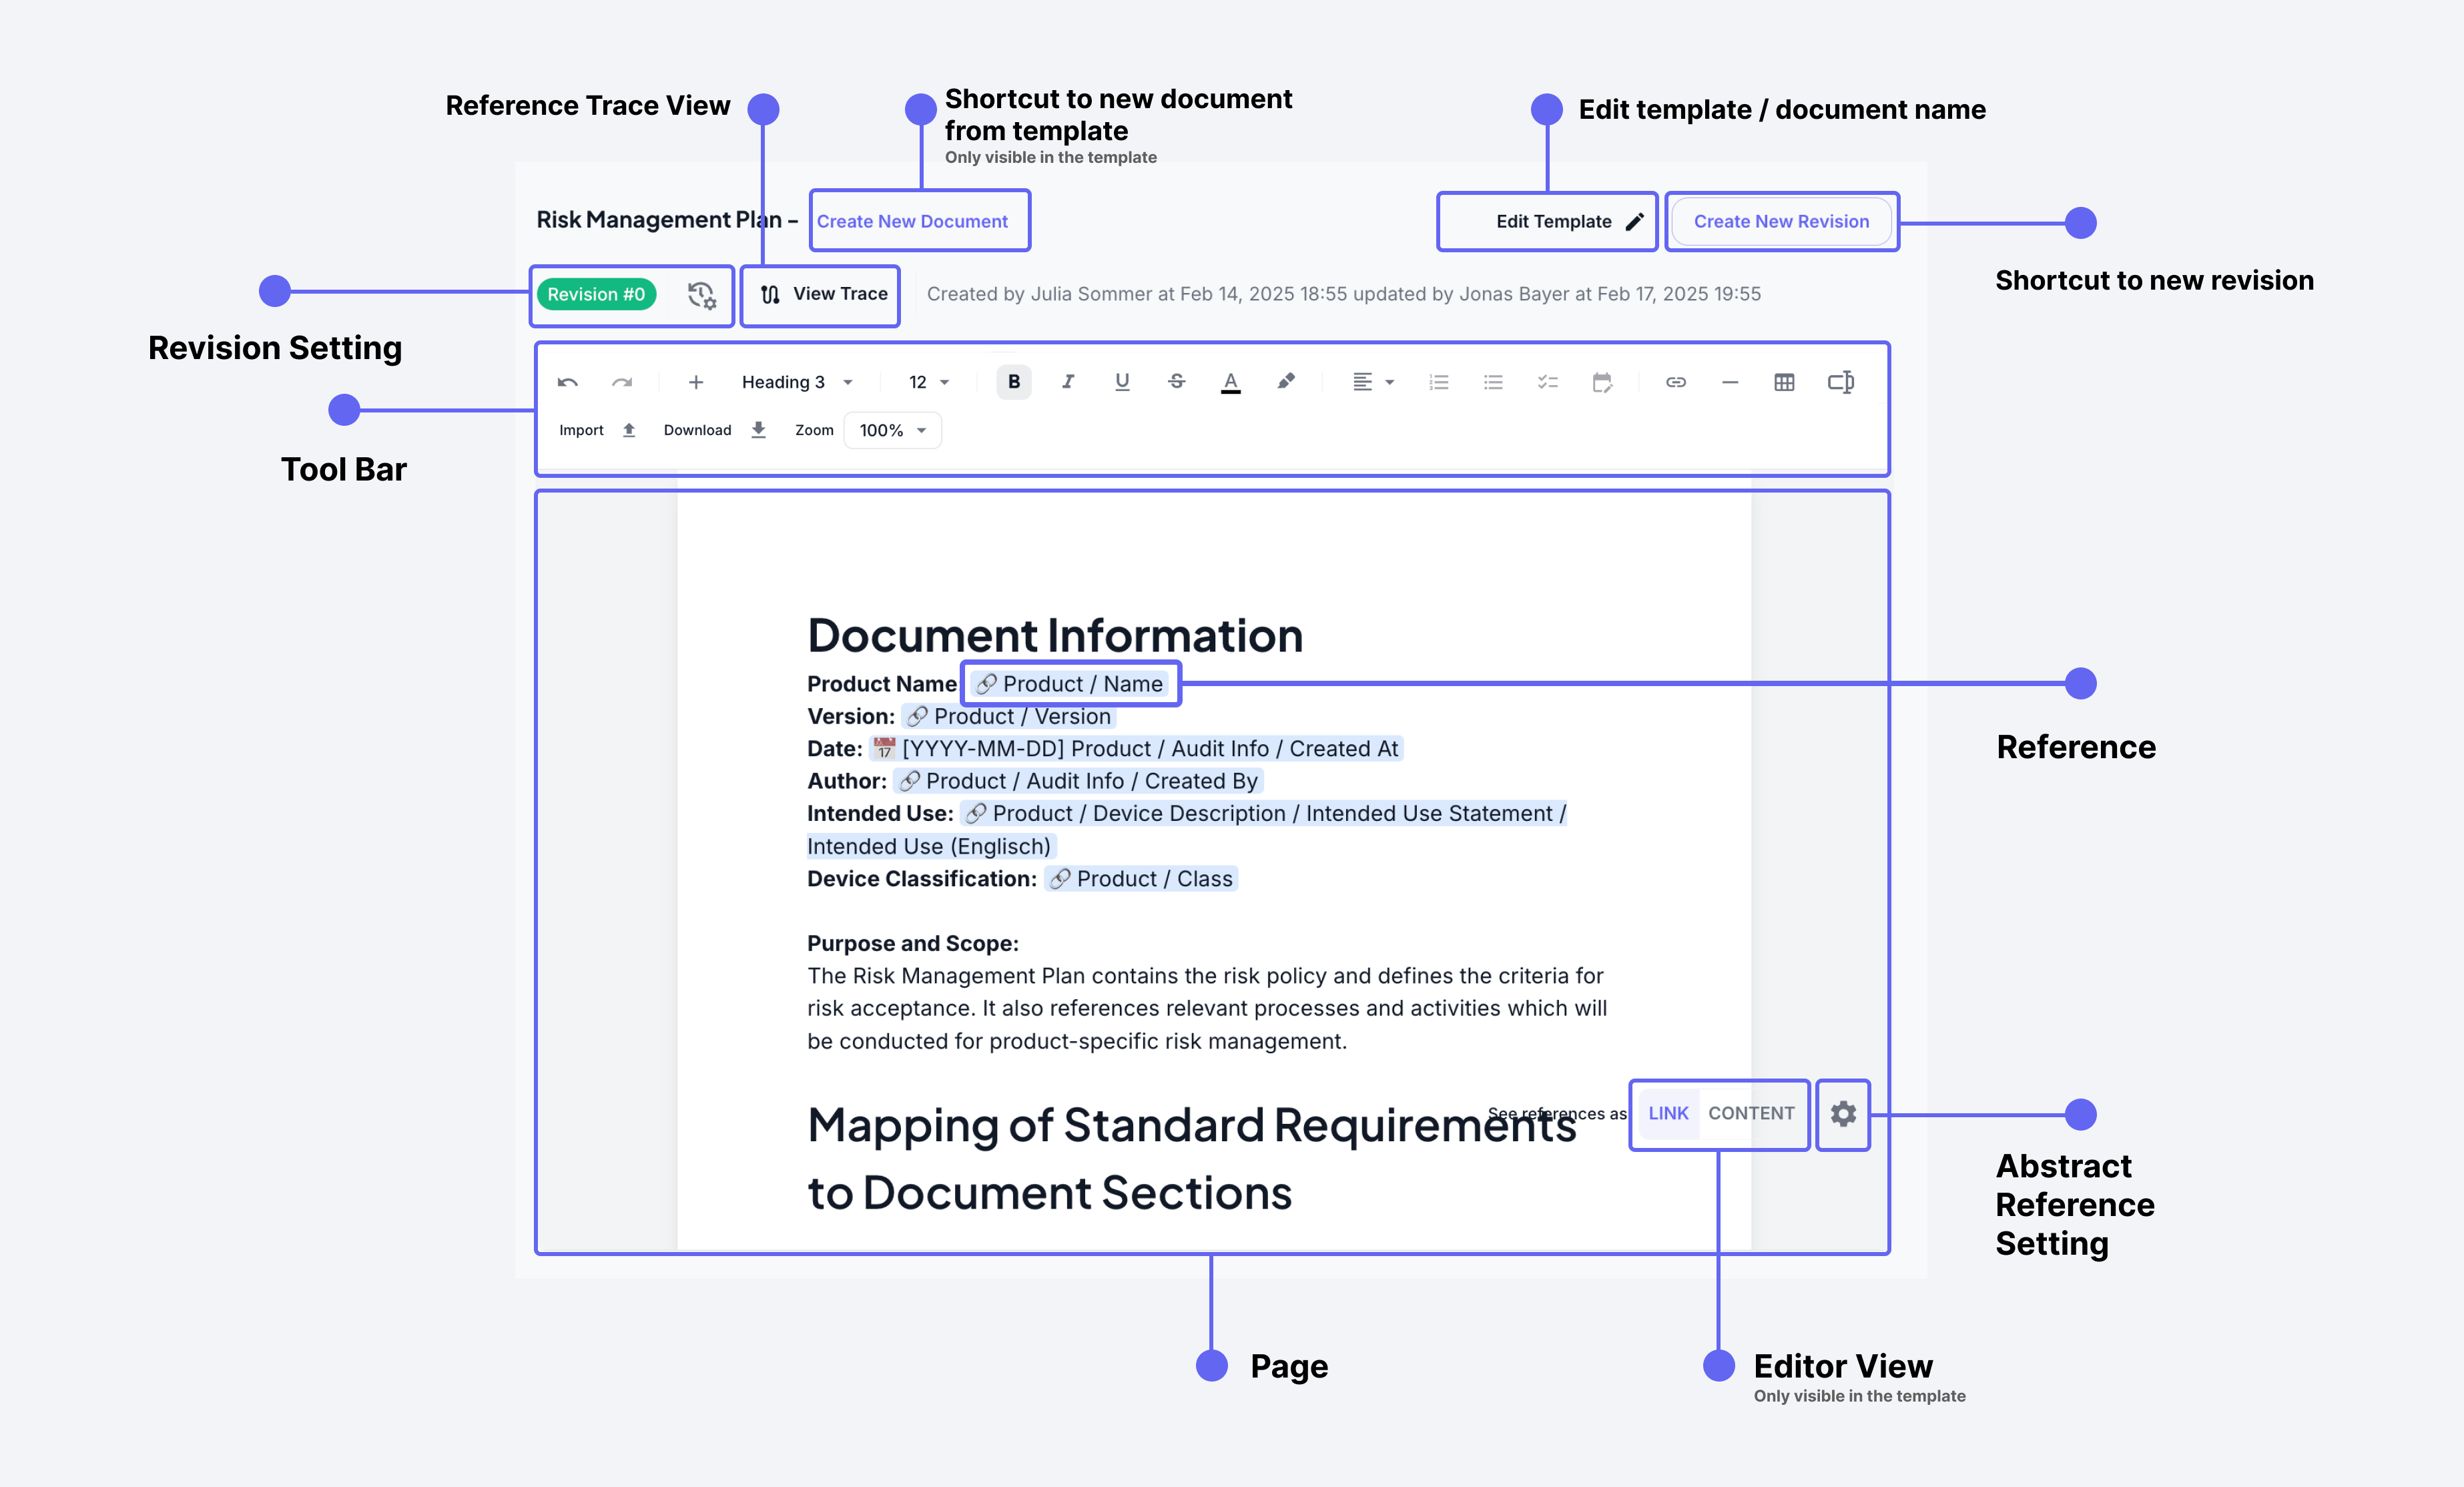
Tool Bar
The Tool Bar provides essential text formatting and document management tools:
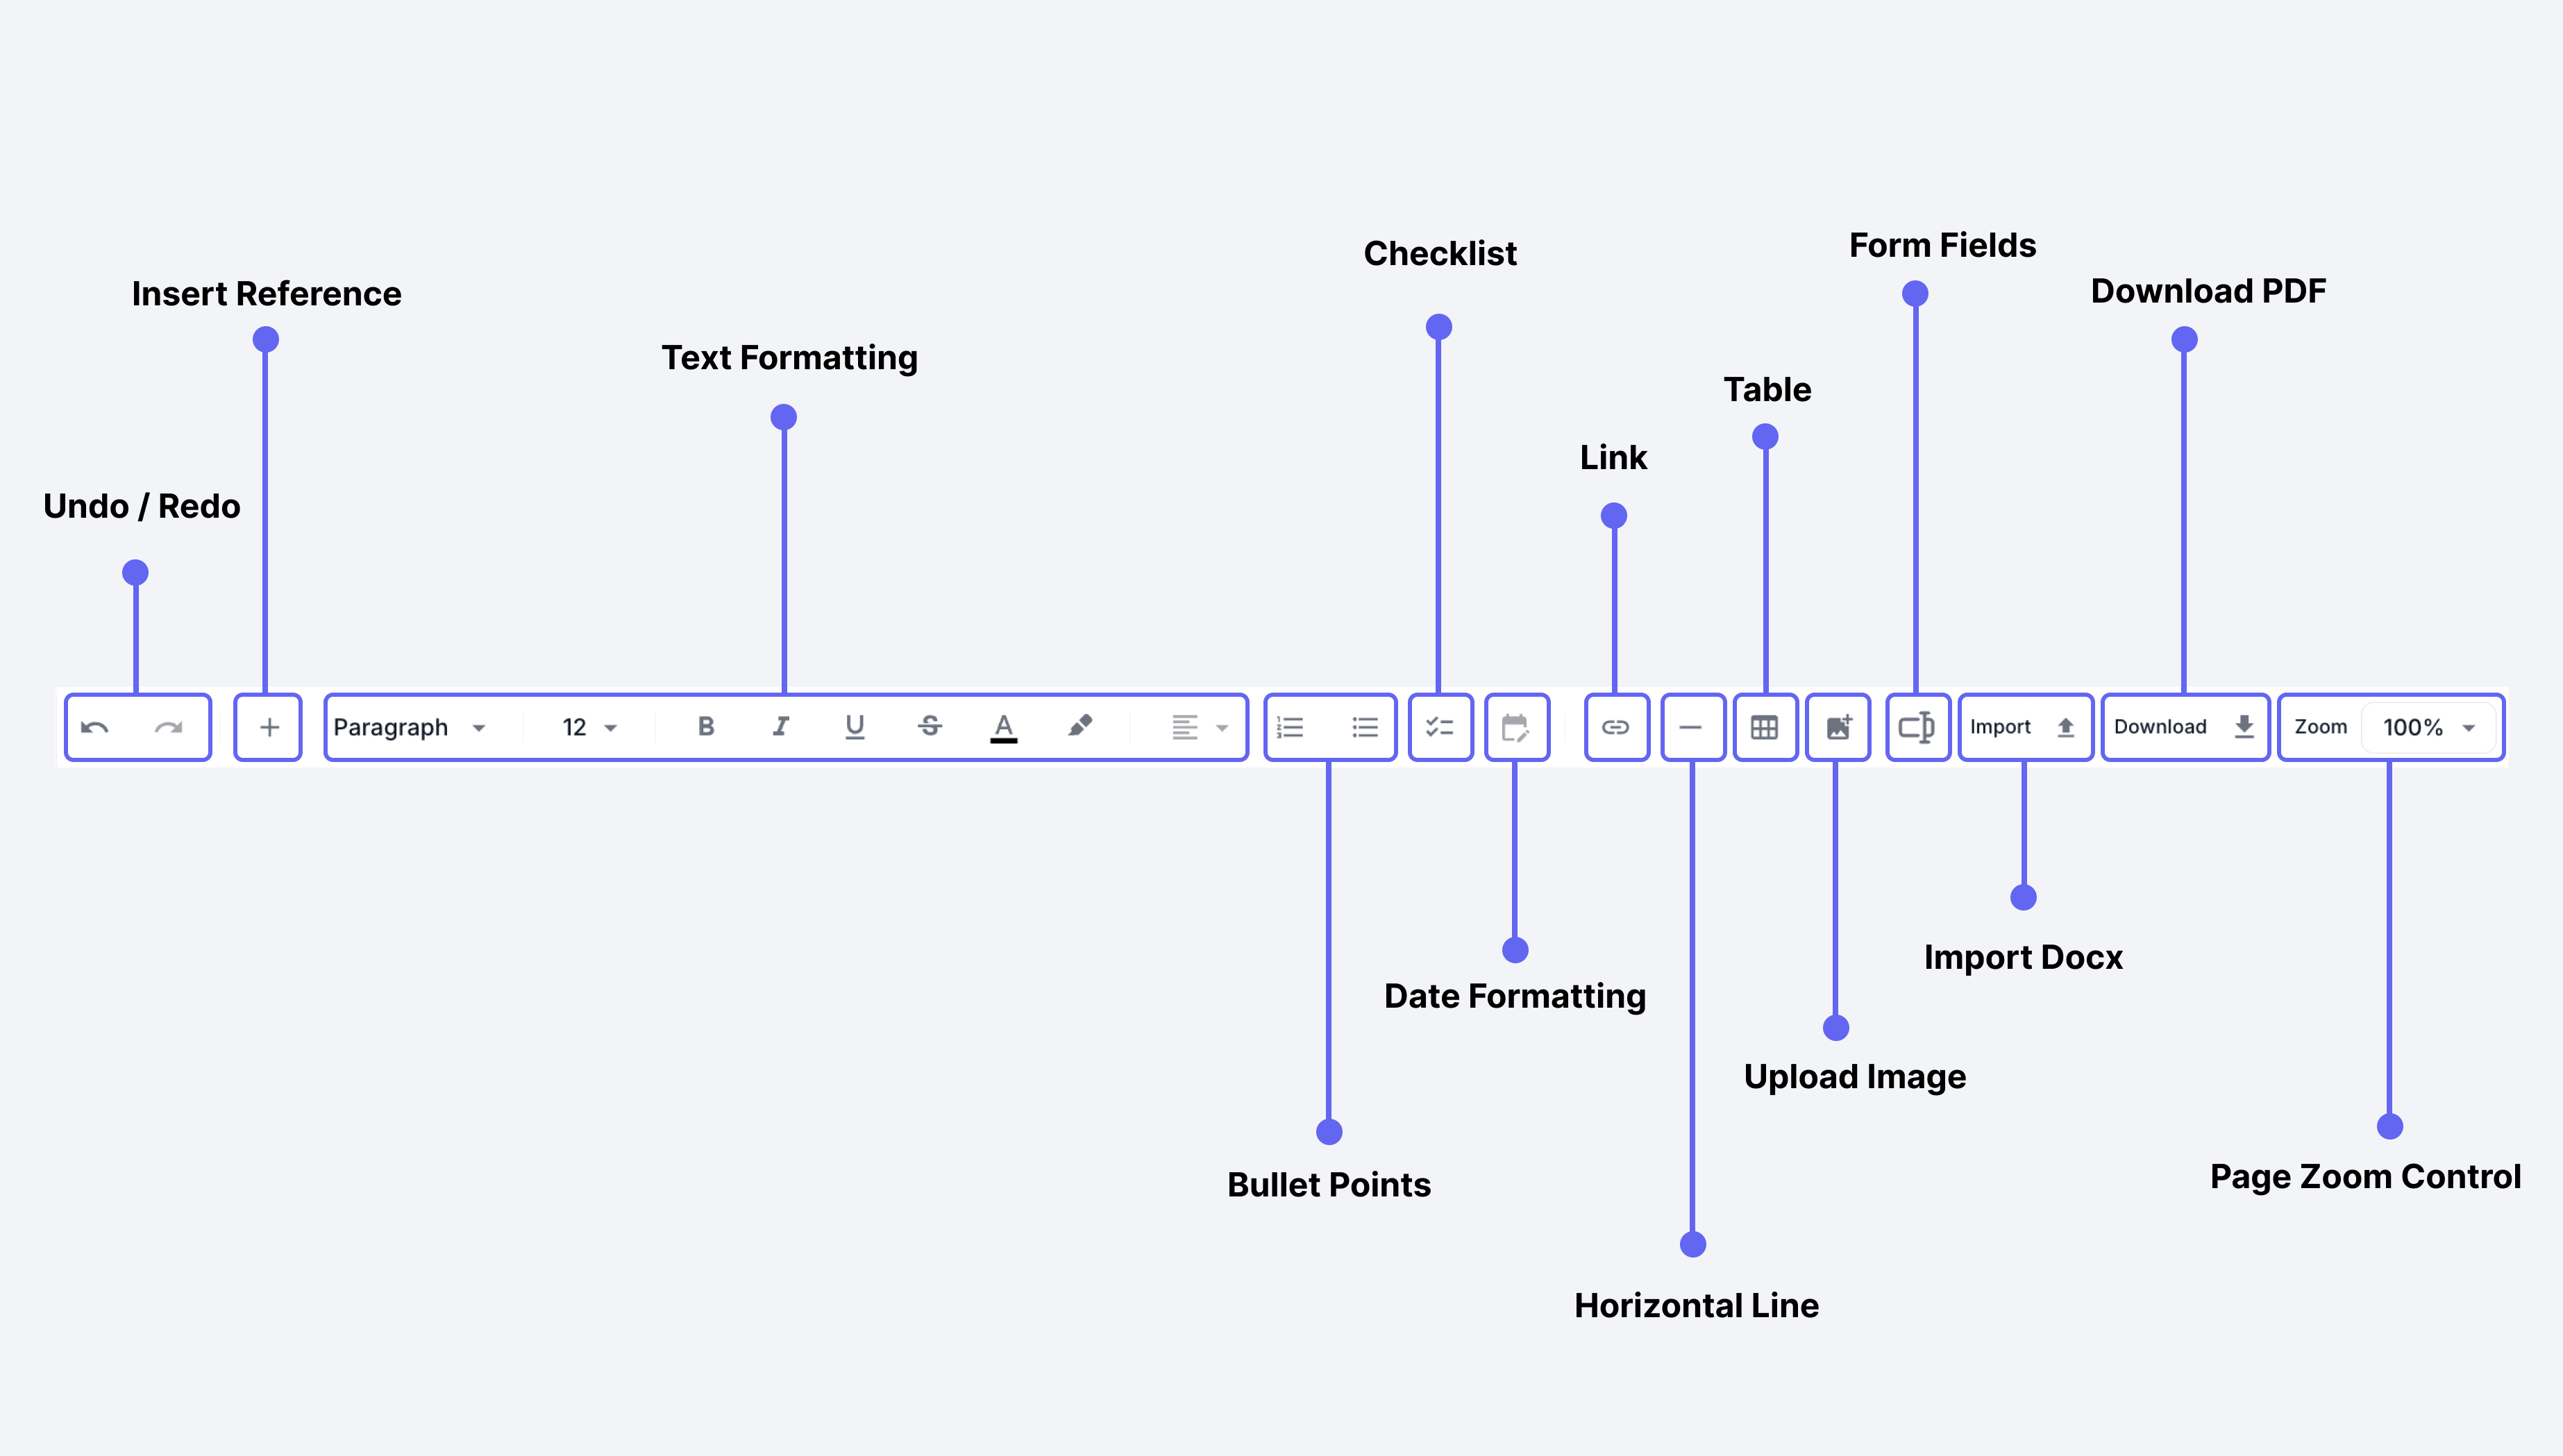
Basic Controls
-
Undo/Redo
- Undo (←): Reverse your last action
- Redo (→): Reapply previously undone action
-
Heading & Paragraph Styles
- Dropdown menu for text styles
- Options include Heading 1, 2, 3, 4, 5, 6 etc.
- Paragraph formatting presets
-
Font Controls
- Text size adjustments
- Font family selection
- Character spacing
Text Formatting
-
Basic Formatting
- B: Bold text
- I: Italic text
- U: Underline text
S: Strikethrough text
-
Text Alignment
- Left align
- Center align
- Right align
- Justify text
-
List Controls
- Bullet points
- Numbered lists
Advanced Features
-
Document Elements
- Checklist: Create interactive checklists
- Link: Insert hyperlinks
- Table: Create and format tables
- Horizontal Line: Add section dividers
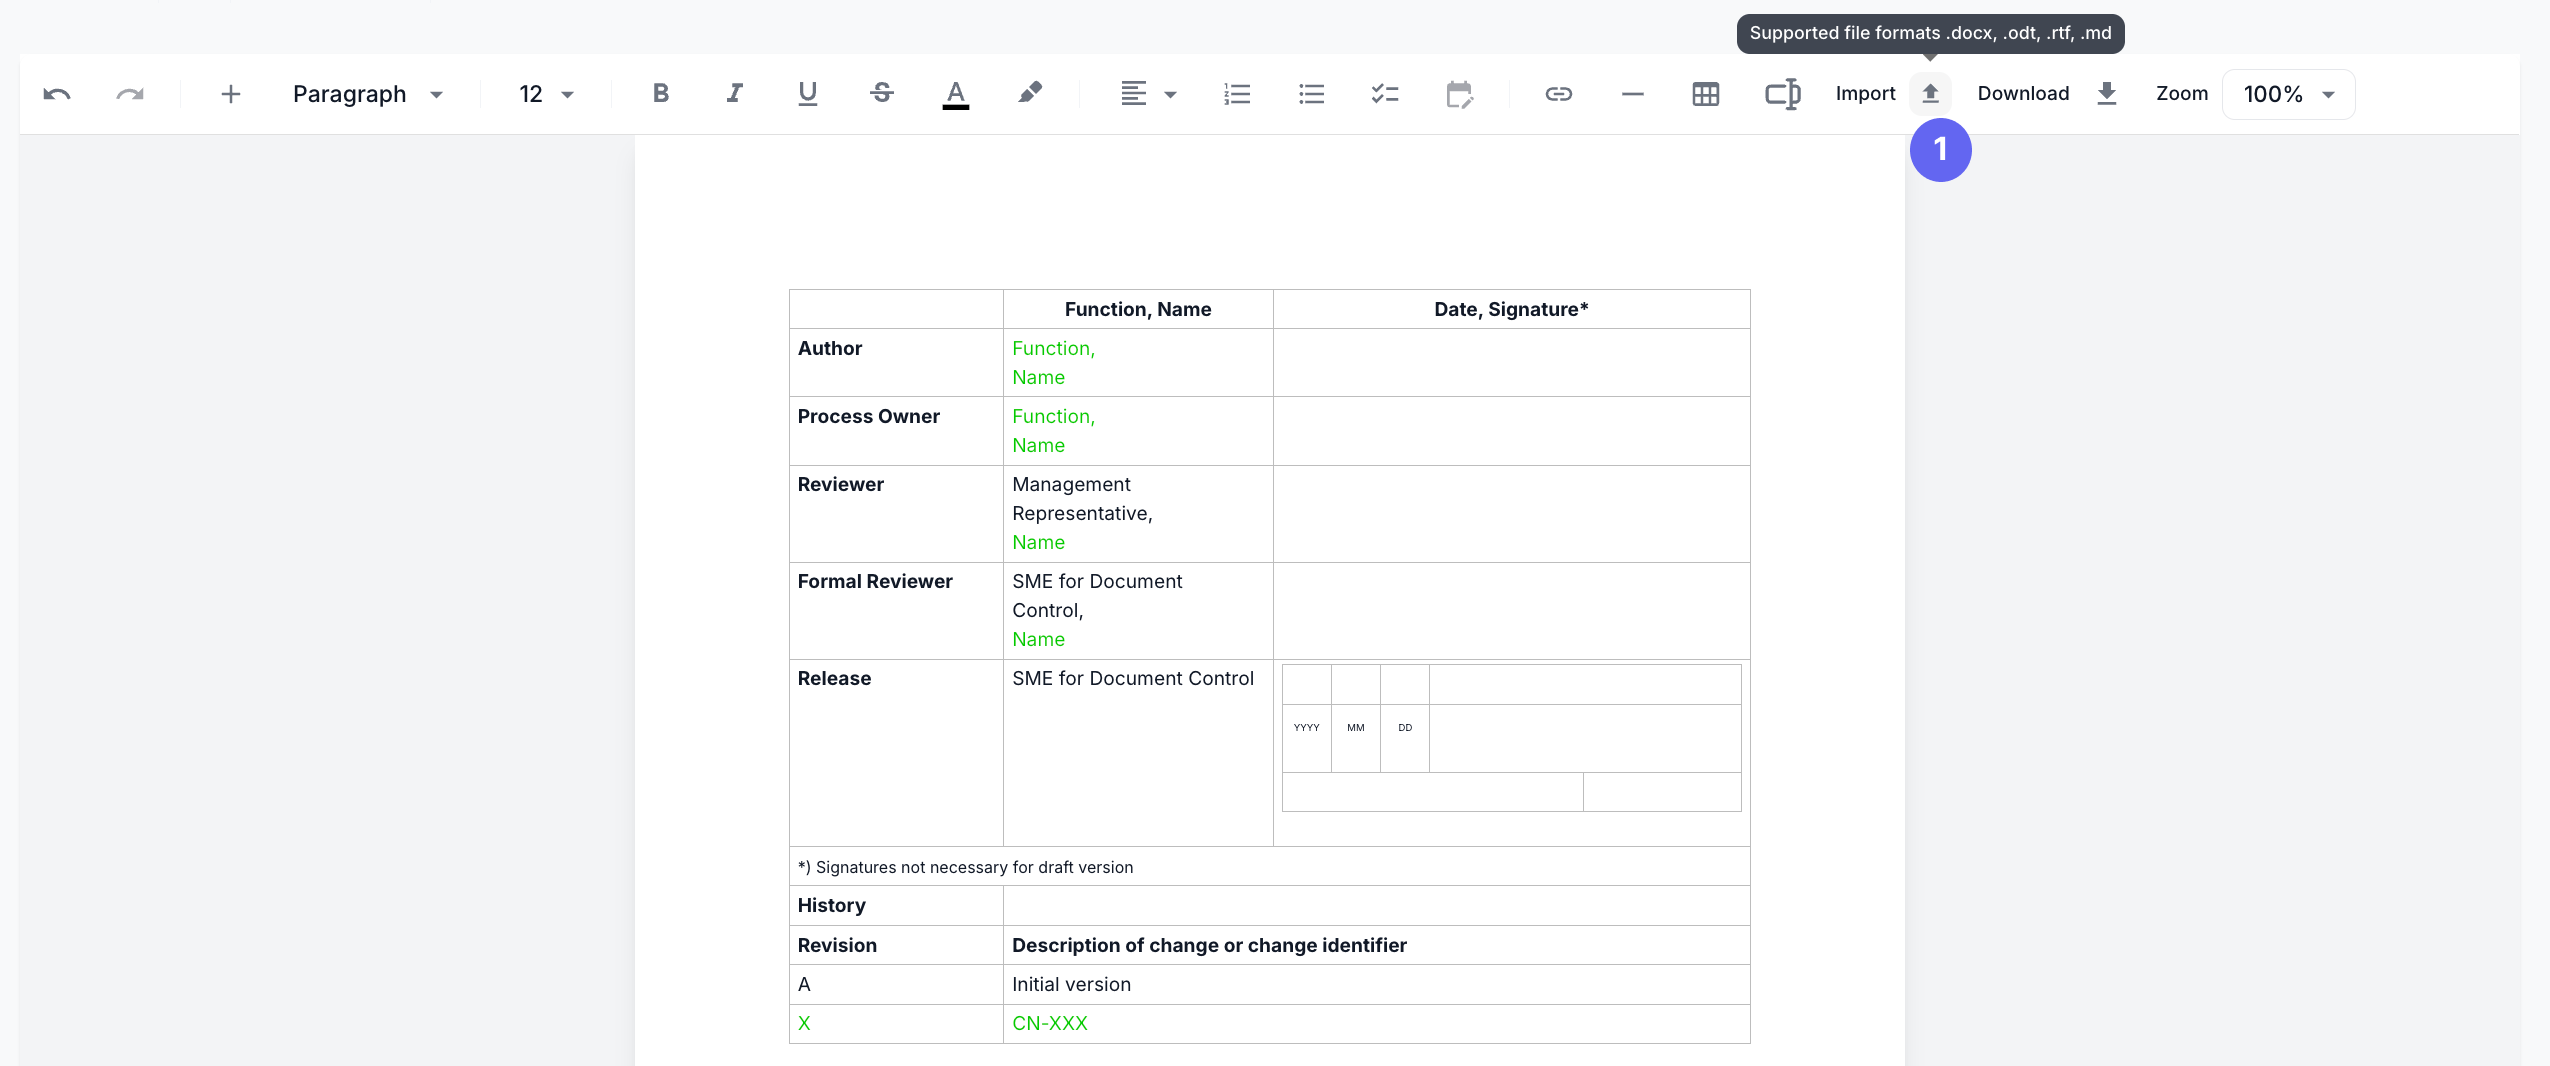
- Import: Import Word documents directly into the editor
- Image: Upload or drag & drop images into the editor
-
Other Controls
- Download PDF: Export document
- Zoom: Adjust view size (100% default)
- Toggle Tool Bar: Show/hide sub toolbar
-
Date Formatting for reference
Available date formats:
- YYYY-MM-DD: Standard ISO format (e.g., 2024-03-14)
- MM/DD/YYYY: US format (e.g., 03/14/2024)
- DD.MM.YYYY: European format (e.g., 14.03.2024)
- YYYY-MM-DD hh:mmA: ISO with 12-hour time (e.g., 2024-03-14 02:30PM)
- DD.MM.YYYY HH:mm: European with 24-hour time (e.g., 14.03.2024 14:30)
-
Insert Reference (+)
Two types of references available:
-
Abstract (Shortcut: /)
- Adds generic content reference of Product, SOP, Form, Work Instruction.
- References that can be swapped through Abstract Reference Settings
- Content changes based on what Product, SOP, Form, Work Instruction is selected in Reference Settings
- Perfect for reusable templates that work with different Products, SOPs, Forms, Work Instructions.
- Example: When you use
Product / Name, the actual content will change based on which Product is selected in Abstract Reference Settings
-
Specific (Shortcut: @)
- Adds specific content reference of Product, SOP, Form, Work Instruction, Document, Template.
- Fixed reference that points to exact content
- Example: When you select "Sterilisator 20A", it will always show that specific product's information
- Cannot be changed through Abstract Reference Settings
- Used when you need to reference a particular Product, SOP, Form, Work Instruction, Document, Template
-
-
Insert Form Fields
Form fields allow to input structured data directly into documents created in your text editor. These fields can include textboxes, checkboxes, enabling interactive and customizable forms.
Types of Form Fields
text editor supports the following types of form fields:
- Text Boxes: Allow users to enter single-line or multi-line text.
- Check Boxes: Enable users to select or deselect options.
Customizing Form Fields
You can customize form fields by modifying their properties: Click the three dots and click the Setting.
When you add Form Fields/Input Fields to a template, it becomes a Form-Template that can be used in QM Lists.
For more information about QM Lists, see QM List.
Keyboard Shortcuts
For improved efficiency, use these common shortcuts:
| Action | Windows/Linux | Mac |
|---|---|---|
| Undo | Ctrl + Z | ⌘ + Z |
| Redo | Ctrl + Y | ⌘ + Y |
| Bold | Ctrl + B | ⌘ + B |
| Italic | Ctrl + I | ⌘ + I |
| Strike | Ctrl + Shift + X | ⌘ + Shift + S |
| Underline | Ctrl + U | ⌘ + U |
| Insert Link | Ctrl + Shift + U | ⌘ + Shift + U |
| Order List | Ctrl + Shift + 7 | ⌘ + Shift + 7 |
| Unorder List | Ctrl + Shift + 8 | ⌘ + Shift + 8 |
| Copy | Ctrl + C | ⌘ + C |
| Cut | Ctrl + X | ⌘ + X |
| Paste | Ctrl + V | ⌘ + V |
| Select All | Ctrl + A | ⌘ + A |
| Specific Ref | @ | @ |
| Abstract Ref | / | / |
| Textfield | Ctrl + Shift + 1 | ⌘ + Shift + 1 |
| Checkbox | Ctrl + Shift + 2 | ⌘ + Shift + 2 |
| Number Field | Ctrl + Shift + 3 | ⌘ + Shift + 3 |
| Date Field | Ctrl + Shift + 4 | ⌘ + Shift + 5 |
| Select Field | Ctrl + Shift + 5 | ⌘ + Shift + 5 |
| Radio Field | Ctrl + Shift + 6 | ⌘ + Shift + 6 |
Page
The Page is the main document editing area where you write and format your content, similar to other document editors like Google Docs or Microsoft Word.
Abstract Reference Settings
The Abstract Reference Settings panel, accessed by clicking the gear icon (⚙️) in the right bottom side, allows you to configure which entities your abstract references point to. This is where you can swap the content source for abstract references.

Available Context Types
-
SOP
-
Work Instruction
-
Form
-
Product
Usage
-
Changing Reference Sources
- Click the gear icon (⚙️) to open settings
- Select the context type (SOP, Work Instruction, Form, Product)
- Choose the specific entity from the dropdown
- Click "Save" to apply changes
-
Effects
- All abstract references (/) will update to show content from the newly selected entity
- Specific references (@) remain unchanged
- Changes apply throughout the editor
Example
If you change the Product in Reference Settings from "Sterilizer 23B - FDA" to "Insulin Pump X100":
- Abstract reference
/Product/Namewill change from "Sterilizer 23B - FDA" to "Insulin Pump X100" - Abstract reference
/Product/Classwill update from "Class II" to "Class III" - Specific reference
@Sterilizer 23B - FDA/Nameremains unchanged
Editor View
The Editor View is a template-specific feature that allows you to switch between different views of referenced content. This toggle functionality is only available in template editor.
View Types
-
LINK View
- Shows the reference paths instead of actual content
- Displays references in format like:
Sterilisator 20A / NameSterilisator 20A / Risk Class
- Helps template authors verify reference paths
- Useful for debugging reference issues
-
CONTENT View
- Shows the actual content from the references
- Displays the resolved content instead of reference paths
- Examples:
- Instead of
Sterilisator 20A / Name, shows "Sterilisator 20A" - Instead of
Sterilisator 20A / Risk Class, shows "Class IIb"
- Instead of
Revision History
The Revision system provides comprehensive version control for your documents and templates. It helps you track changes, maintain document history, and ensure compliance with audit requirements.
Understanding Revisions
Each document or template maintains a complete history of changes through revisions. When you create a new revision, the system captures the entire state of the document along with metadata about the change.
A revision includes:
- A unique revision number
- A descriptive commit message
- Content state at that point in time
Creating New Revisions
To create a new revision:
- Click the "Create New Revision" button at the top of your document
- In the revision dialog, enter a descriptive commit message explaining your changes
- Click "Create New Revision" to save
The system will automatically:
- Increment the revision number
- Save your commit message
- Capture the document's current state
- Mark this version as "latest"
Working with Historical Versions
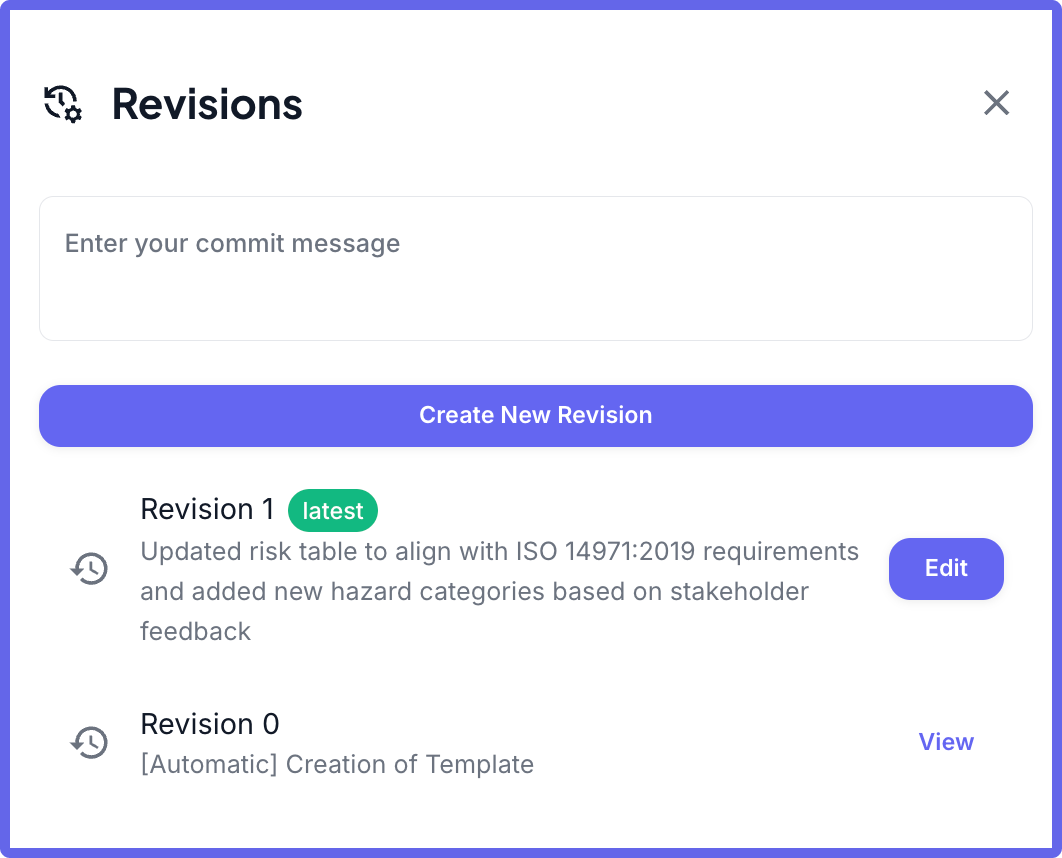
The revision history provides a complete audit trail of your document. The current version is always marked as "latest" and is fully editable. All previous versions are preserved in a read-only state for reference and audit purposes.
To access historical versions:
- Click the revision icon (🕔🔄) to open the revision history
- Browse through previous versions
- Select any version to view its content and metadata
One powerful feature of the revision system is the ability to create new documents or templates from any historical version. This is particularly useful when you need to:
- Branch from a previous version
- Create variations of existing documents
- Recover content from older versions
Reference Trace View
The Reference Trace View provides a comprehensive overview of all document relationships and references. This feature helps you track and manage how documents are connected through various reference types.
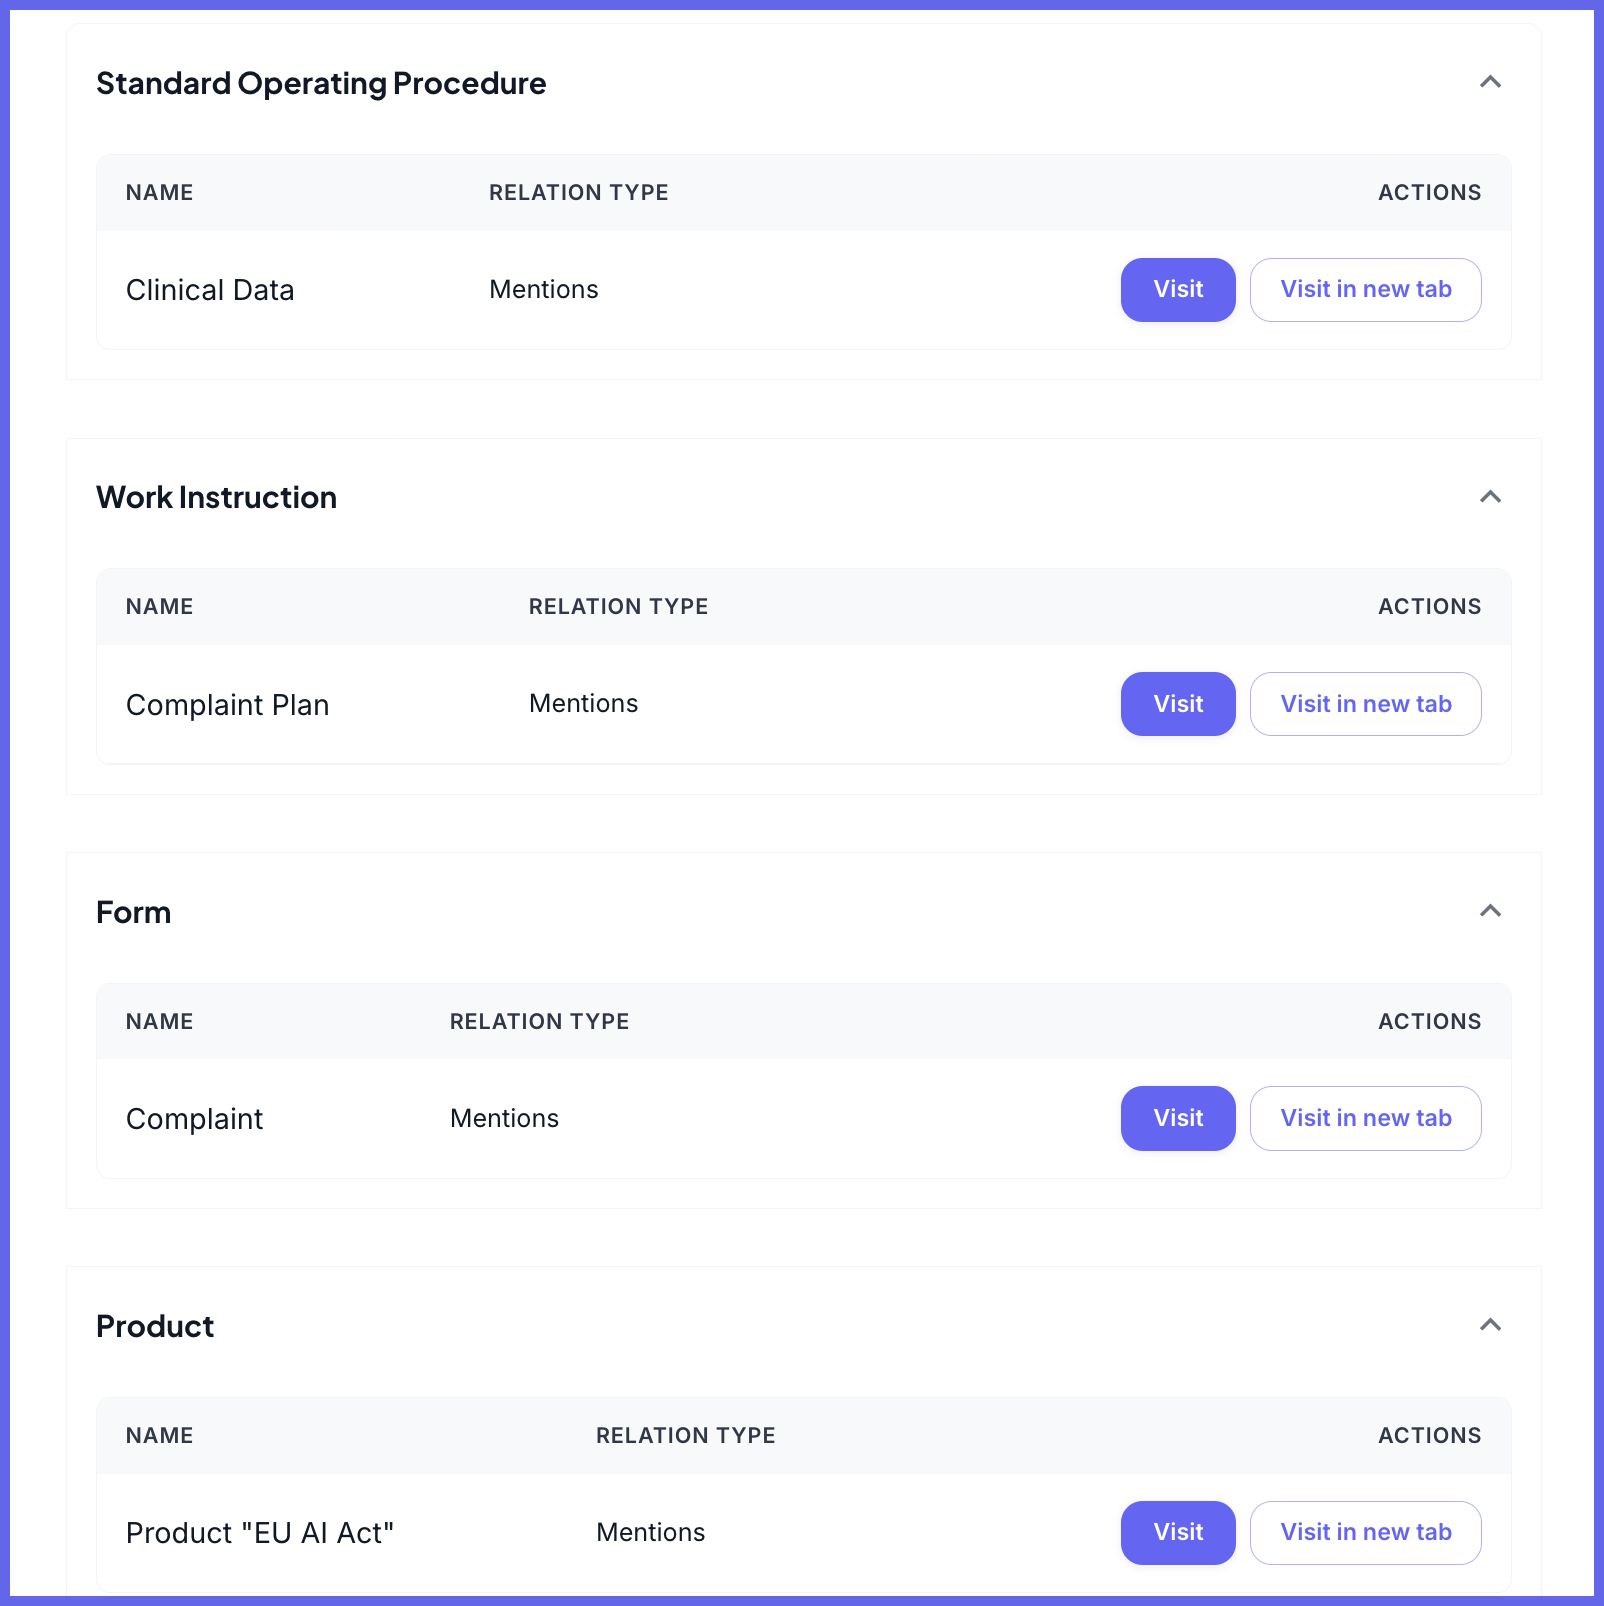
Understanding the Trace Dialog
When you click the "View Trace" button, you'll see a dialog organized into different sections based on document types:
- Standard Operating Procedure (SOP)
- Work Instruction
- Form
- Product
Features and Actions
Each reference in the trace view includes:
-
Reference Information
- NAME: Document or item name
- RELATION TYPE: How items are connected
- ACTIONS:
- "Visit": Open the referenced document
- "Visit in new tab": Open in separate tab
Use Cases
The Reference Trace View is particularly useful for:
-
Document Management
- Track document dependencies
- Verify reference integrity
- Manage document relationships
-
Quality Assurance
- Ensure proper document linkage
- Validate reference completeness
- Maintain documentation standards
-
Audit Preparation
- Review document connections
- Verify regulatory compliance
- Track document relationships
Importing Word Documents
The Text Editor now supports direct import of Microsoft Word (.docx) files, allowing you to easily convert existing Word documents into CertHub's format while preserving most of the original formatting.
How to Import Word Documents
- Open any document or template in the Text Editor
- Click the "Import" button in the toolbar
- Select your Word document (.docx file) from your computer
- Wait for the system to process and convert the document
- Review the imported content and make any necessary adjustments
What Gets Preserved
The import feature intelligently extracts and preserves:
- Document structure (headings, paragraphs)
- Basic text formatting (bold, italic, underline)
- Lists (bulleted and numbered)
- Tables with basic formatting
- Simple images
- Basic page layout
Limitations
Some complex Word features may require manual adjustment after import:
- Advanced formatting (text effects, complex styles)
- Complex tables with merged cells or special formatting
- Embedded objects (charts, SmartArt)
- Macros and form fields
- Comments and tracked changes
- Headers and footers (these may be imported separately)
For more information about importing data into CertHub, see the Importing Data documentation.